Wednesday, April 10, 2013

Free crochet baby barrette pattern

I've come down with a slight case of baby fever recently and have been trying to cure it by crocheting a bunch of newborn sized beanies. FYI that doesn't work
It just gets worse.... Anywho I thought I'd share the pattern I came up with for this adorable 0-3mo size rose embellished barrette :-)

Materials: worsted weight yarn (I used red heart super saver) Size H/8 crochet hook, stitch markers (I just use yarn or a bobby pin or a safety pin..... whatever I have on hand) and a tapestry needle
Hat
This pattern is worked in the round
Rnd1: Ch4, 10dc in 4th ch from hook, place stitch marker in 10th dc. Pull tail of first chain loop (the chain that you just made 10 dc in) tight to round out your stitches. (10dc)
***Note:ch3 does not count as dc.

Rnd2: 2dc in 1st dc of rnd1 continue with 2dc in each stitch until the end of the round. Place stitch marker in last dc (20dc)
Rnd3: *2dc in next stitch, 1dc in next* repeat from *to* place stitch marker in last stitch (30dc)

Rnd4: *2dc in next stitch, 1dc in next 2 stitches* repeat from *to* place stitch marker in last stitch (40dc)

Rnd5: *2dc in next stitch, 1dc in next 3 stitches* repeat from *to* place stitch marker in last stitch (50dc)

Rnd6: *2dc in next stitch, 1dc in next 4 stitches* repeat from *to* place stitch marker in last stitch (60dc)

Rnd7: 1dc in each stitch around. Place stitch marker in last stitch (60dc)

Rnd8: yarn over, insert hook in stitch, yarn over, pull up loop, yarn over, pull through 1 loop yarn over, insert hook in next stitch, yarn over, pull up loop, yarn over, pull through 1 loop, yarn over, pull through 2 loops, yarn over, pull through all remaining loops on hook. (Dc2tog) *1dc in next 4 stitches, dc2tog* repeat from *to* place stitch marker in last stitch (48dc)

Rnd9:Dc2tog in next stitch *1dc in next 3 stitches, dc2tog in next stitch* repeat from *to* place stitch marker in last stitch (36dc)

Rnd10:1dc in each stitch around place stitch marker in last stitch (36dc)

Rnd11-12:1sc in each stitch around (36sc)

Tie off and weave in ends

Roses:for the larger roses (make 2) Ch23 sc in 3rd ch from hook *2dc in next stitch, ch1, 2tc in next stitch, ch1, 2dc in next stitch, ch1, 2sc in next stitch, slip stitch into next stitch, 2sc in next stitch, ch1* repeat from *to* until the end of the chain and tie off

For the smaller rose (make 1) ch15, sc in 3rd ch from hook *2dc in next stitch, ch1, 2sc in next stitch, slip stitch in the next stitch, 2sc in next stitch, ch1* repeat from *to* until the end of the chain then tie off.

Now just roll your roses up like a cinnamon roll and use your tapestry needle to throw a couple stitches through the center of the rose to keep it rolled, tie off and stitch them onto your hat :-)

hope you enjoy this pattern! And if you aren't big on crocheting, just email me at HappyHookCrochet@gmail.com And I can make one of these hats for you!


Saturday, June 9, 2012

Rainbow of Boobies

Boobies!!!


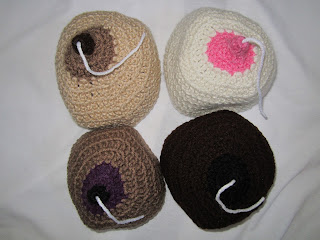
Since I did the Boobie Beanie Pattern I couldn't leave you with just a picture of a light colored boobie so here I present you with a rainbow of boobie beanies!


There are so many different shades of boobie out there so I had to make a few..... and for the Milky Mammas I of course couldn't help myself and made some milky boobie beanies!

Milky!

I seriously could not stop laughing all night after making the milky boobies. They look hysterical! All I did was tie a piece of white yarn inside and pull it through the top  and voila! a Milky Boobie! 


If you would like your very own Boobie Beanie or Milky Boobie Beanie don't hesitate to email me at HappyHookCrochet@gmail.com and I would be happy to make you your very own!  


Thursday, May 31, 2012

Free Flower Pattern


Flowers are always fun to crochet! I love experimenting with different color combinations and petal shapes whenever I have a moment to just chtocet whatever I feel like. I made this flower this morning and thought I'd share!


Materials :Any yarn and hook appropriate for yarn. I used worsted weight yarn and a size H hook.

Pattern: 
Rnd1:Ch4, join with sl st to make a loop.
Rnd2:*Sc into loop, ch5* repeat from *to * 4 more times. Join with sl st to first sc. Ch1(5sc) 
Petals: Work into ch5 space *1sc, ch1, 1hdc, ch1,1dc, ch1,1hdc, ch1,1sc* repeat from *to* in every ch5 space around. Join with sl st to first sc. Ch1. 
Turn flower over.

This is the front of your flower and what it should look like after the petals are finished and you have joined with a slip stitch
Turn Flower over. This is the back of the Flower.
Sl st around connecting sc as shown in the picture below. 
Ch8 (counts as 1sc+ch6) *sc into next connecting sc, ch6* repeat from *to* around join with sl st to 2nd ch on ch8. Ch1 

Slip Stitch around this single crochet
ch8 and sc around next sc 

Turn flower back over so front is facing you. 

Change colors if desired. 
Petals: into Ch6 space *1sc, ch1, 1hdc, ch1, 2dc, ch1, 1hdc, ch1, 1sc* repeat from *to* around. Join with sl st to first sc. 
Weave in ends


Have fun! This would make a great button-on flower if you have a project you would like to button a flower onto!

Tuesday, May 29, 2012

So little time

I have so many ideas lately for different projects, but I just haven't had the time to start any of them! I have a couple hat orders I've been working on in between chasing around my rambunctious, crawling/prewalking 7month old.
Ya. That's my life

I did manage to set up a  Craftsy account and have been having some fun with that. I can post my projects for free and also list and sell patterns, if I want to, free of charge!

I'm in love.

I also purchased Crochet Stitches Visual Encyclopedia for my kindle the other day and holy cow! There are so many awesome stitches I'm dying to put to use! I just can't get over how beautiful crochet can be as I flip through the pages and see so many amazing stitch patterns and the way the book lays out the patterns for every stitch is awesome and so easy to understand! You really can learn visually! And there is even an entire chapter dedicated to Tunisian crochet! I think I'll start working on an afghan sampling some different stitches explained in the book. 

And to add to my ever growing list of things I'll *eventually* get around to I'm planning my Christmas projects . I asked my 70something grandma today if she would like me to crochet her something for Christmas and her response was "Yes......But not a boob" OMG Apparently Grandma saw the Boobie Beanie Tutorial! LOL 


Grandma is not the biggest fan of Boobie Beanies

She then proceeded to tell me that she might like a boob warmer though....ummm? hahaha Oh grandma....
Anyway, I hope to have some new projects to show off soon! Perhaps even a stitch or two to brag about! A boob warmer?? Probably not.

Wednesday, May 23, 2012

Free Boobie Beanie Pattern/Tutorial

Boobie Beanie!

I'm a breastfeeding mom and yesterday I did a special on my Facebook page where if you saw my post on "the leaky b@@b" Facebook page and mentioned it to me in a message I would make you a boobie beanie for just $8. I normally charge $10-$12. These boobie beanies aren't for everyone! But a lot of people love them! They make a great baby shower gift for a future breastfeeding mom. Moms like to put them on their babies in the hospital in case baby is in the nursery the nurses will know that their baby is to be breastfed only . 
Awesomeness

Other moms are pro-breastfeeding in public and like to put them on their babies while they nurse ( I think its awesome!). They're great for breast cancer awareness or cancer walks if you want a team of boobie heads :-) and they make great gifts for people that just really love boobies! I'm sure most of us can think of a few boobie lovers that we know....Anyway I've decided to post a boobie hat pattern! Please let me know if you find any mistakes in this pattern because I am not exactly a pattern writer. Enjoy!.


Materials Needed: Worsted weight yarn. I used Red Heart Super Saver in Aran for the body of the hat, Perfect Pink for the nipple and Light Raspberry for the tip of the nipple. Since this is  a very Caucasian looking boobie
Size G Crochet Hook  or whatever is needed to obtain gauge 
Tapestry Needle  for weaving in ends
Gauge: 7 dc= approx 2in/5cm 2rows= approx 1.5in/4cm
This hats is sized to fit a 0-6mo baby. Approx 4.5in diameter and 5in height.


Tip is slightly darker than the rest of the nipple (because that's kind of how nipples look! duh!)

I used a darker shade of pink for the tip, but that's not necessary!
Pattern: 
Rnd1: Ch3, dc into 3rd ch from Hook (see photos bellow) continue with 4 more dc into same ch. sl st into top of ch2 to join (6dc)  


Rdn2: (can join new color if desired) Ch3(counts as dc here and throughout) 1dc in next st, 2dc in every st around. sl st into top of ch3 to join (10dc)
Rnd3: Ch3 2dc in each st around. sl st into top of ch3 to join (20dc)

Nipple is complete
Rnd4: Join new color (lighter color) Ch3, 2dc in each st around. sl st to top of ch3 to join. (40dc) 


Rnd5: Ch3 *2dc in next st, 1dc in next* Repeat from *to* around sl st to top of ch3 to join (60dc)
Rnd6-10: Ch3, 1dc in each st around, sl st to top of ch3 to join.
Rnd11: Ch2, 1sc in each st around, sl st to top of ch2 to join.
weave in ends and voila! Boobie Beanie!


Now enjoy! and if crochet isn't your thing but you really would like a boobie beanie email me at HappyHookCrochet@gmail.com and I'd be delighted to make you one!... or ten! Whatever floats your boat :-)

Monday, May 21, 2012

Beard Me

Beard anyone??? A few months ago while I was laying in bed, well after everyone else in the house was asleep, browsing the internet on my phone  for crochet inspiration ... I happen to stumble up on a picture of something truly magnificent... What? you might ask... I will tell you but be prepared to let out a chuckle!
This picture I found was of a Crochet Bearded Beanie! Right then I decided that I NEEDED to make one of these, but of course life happens and it was put off for a while until a couple days ago when this facial hair fantastico struck me again (yes I just said fantastico). I found a pattern online, but it just wasn't beard enough for my liking  ... so I went to work and made my own! and ladies and gentlemen here I present you with the Bearded Beanie  
Tada! here the beard is buttoned to both sides of the beanie

I made this one to fit my 7mo son and of course he is currently on a modeling strike thanks to teething! so you must use your imagination and picture this on a baby face... ( made you smile!)  

buttoned to one side


I made the hat with buttons sewn on the inside so that you can button the beard on and off. The buttons are small and don't seem to bother my son. There he is bellow happily modeling the hat portion, but when it came to modeling the beard he proceeded to voice his opinion of 7 month olds being forced to have facial hair.  

happy boy!


And below... I couldn't help myself.... 


Now just picture his cute face underneath this beard and not mine.... see it's awesome right!? Not that I'm not going to make myself one of these bad boys!

See the teeth!


Anyway now that we've all had a chuckle I must get back to work making more of these things because they are awesome and that is enough reason to make more. Maybe once the cute, happy, model decides to return from beard strike you will be able to see a picture of him with facial yarn... We can only hope! If you would like one of these made for yourself or someone else beard worthy then don't hesitate to email me with  your order! I'd love to make you one! HappyHookCrochet@gmail.com 

Saturday, May 12, 2012

Just Getting Started!

Here it goes! My first ever Happy Hook Crochet Blog post! 
That's me! (the lady not the baby)
I'm a stay at home/ work at home mommy and wife. I love to Crochet and have had a lot of fun recently making all kinds of animal and character hats 
Doesn't that just make you smile?
 People really seemed to like them and I love making them so..... I started up a little business selling different items that I make! I make everything to order and I love taking custom orders! I have a small inventory of hats so far  that are available to order including the Penguin Hat above. I can make all hats in custom color combos or just the way they are in the pictures! 
Owl Hat
Owl Hat
Girls Pink Sock Monkey Hat

Wool girls flower hat


Spring time Chick hat and Yellow diaper cover 

But of course summertime is almost here! the cool fall and winter months are not in our minds right now.... so I got a request from a woman to make some barefoot baby sandals. I have seen barefoot sandals for adults before but I had never seen them on baby feet. I looked up some pictures of barefoot baby sandals online and OMG! If that wasn't one of the cutest things I've ever seen! Chunky little baby feet wrapped in the cutest little crochet sandals and of course I HAD to make a few of my own!


So stinkin' cute! I'm selling the barefoot baby sandals for $8 a pair. Perfect for summer! 
I'm trying to make it a goal to work on something NEW every week so as I go along I will be posting on here along with a few FREE patterns and who doesn't love those?! 
Thanks for your time and be sure to check back! also "Like" my Facebook Page @ Facebook.com/HappyHookCrocketByChrissy and if you would like to place an order just email me at HappyHookCrochet@gmail.com I'd love to hear from you!